

Adding products to your Shopify store may seem challenging at first, but it’s actually a straightforward process once you get the hang of it. Whether you’re setting up your first product or managing a growing inventory, Shopify provides all the tools you need to organize, customize, and optimize your store with ease.
In this step-by-step guide, we’ll walk you through everything—from adding product details to setting prices, uploading images, and organizing collections. By the end, you’ll be ready to list your products confidently and start selling.
Let’s dive in!
How To Add Products On Your Shopify Store (6 Steps)
Ready to add products to your Shopify store? Let’s understand each step involved in detail and learn how you should proceed.
Step 1 – Login And Access The Product Creation Page
You need a Shopify subscription to create a store. I am using the Shopify Free Trial subscription to lay out the process of adding products.
Logging is simple: head to the Shopify Login page and fill out your account credentials.
Step 2 – Add A New Product and Fill Up The Details
Once you are on the Shopify admin page, it’s time to add the new product.
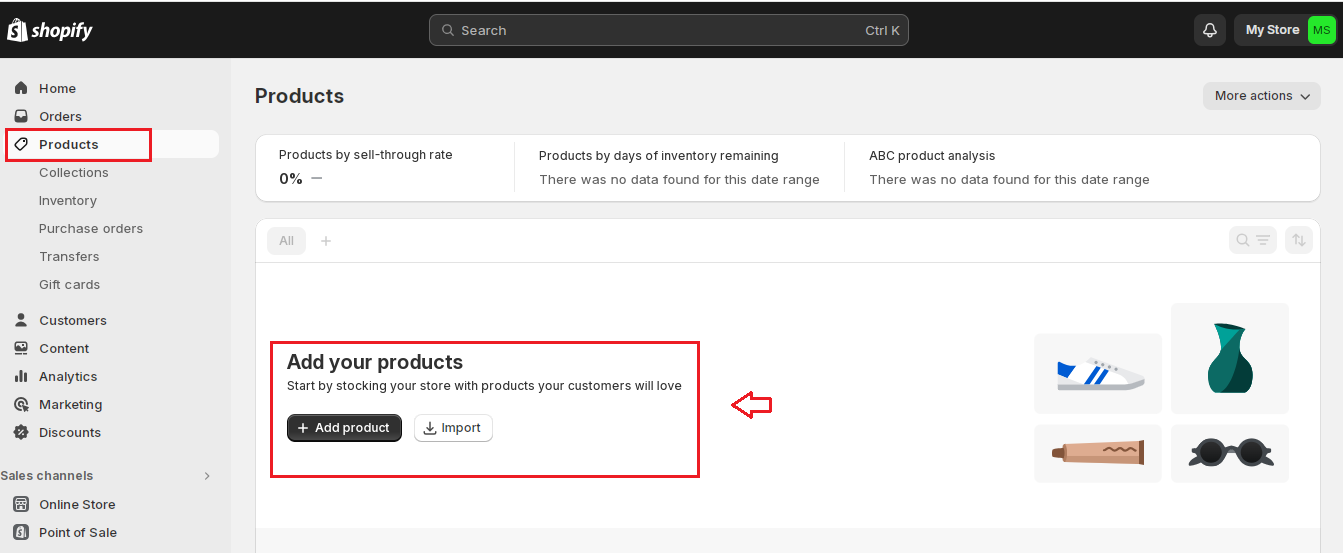
Click on the Product tab on the left panel of the admin page.
In the following screen, click on the Add Product button.
Add Products Description
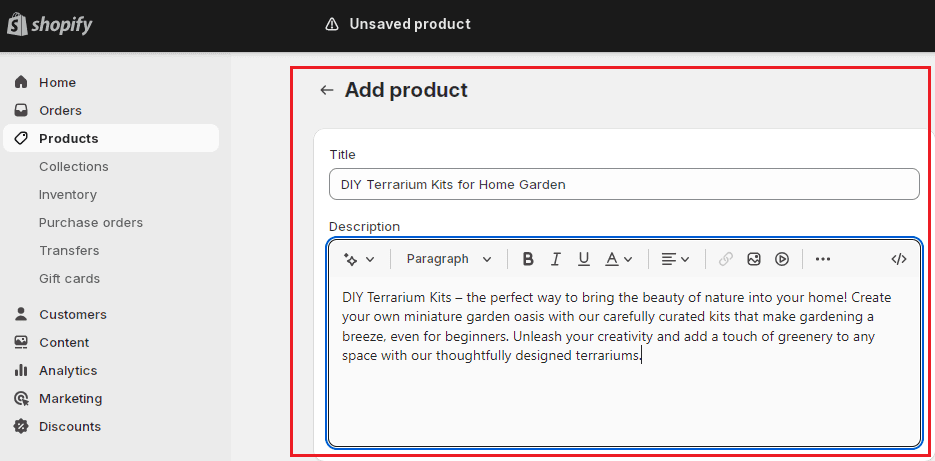
Now comes the description part – I am adding ‘DIY Terrarium Kit.’
Add an appropriate title in the title section, like’ DIY Terrarium Kits for Home Garden.’
Just below the title is the Product Description box – add a detailed description as per your product.
Use Shopify AI Tool (Shopify’s Magic) For Product Descriptions
If writing product descriptions seems daunting, Shopify has an AI assistant to help you with that. In my case, it churned a decent description, which, of course, depends on the details you provide.
Here’s how you can write a product description with Shopify’s Magic;
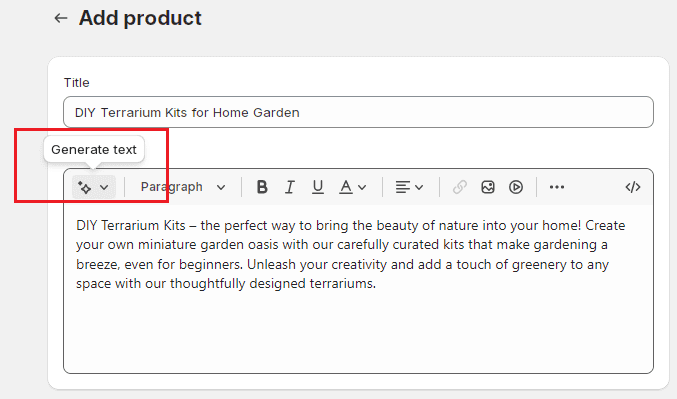
- Click on the Generate Text button in the product description toolbox.
- Provide the keywords you are targeting.
- Pick the tone of the description.
- Click the generate button.
Add Product Images
The media section is just below the description box.
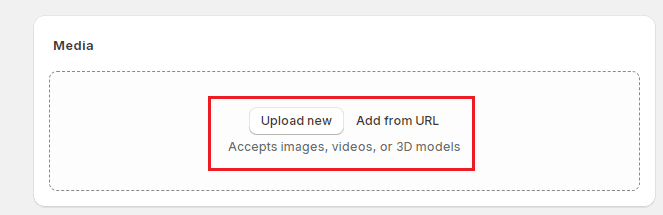
You have three options to add media – Upload New Media, Drag and Drop files, and Add From URL.
Choose the option you want.
Select the product images, 3D Models, or Videos for your product.
Click on the Add File button to upload the media.
Step 3 – Enter Product Information, like Price & Shipping
Once you have added the product images and details, let’s now fill in the sales details;
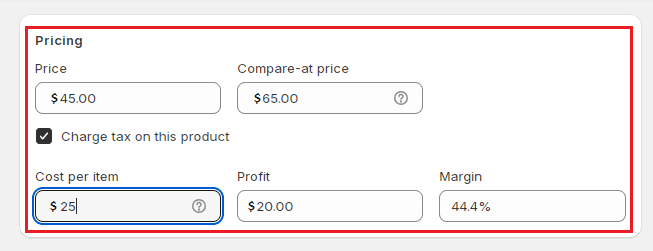
Add Product Pricing
- On the product page, scroll further to the media section to reach the pricing section.
- Set the price, which is the final cost customers will pay.
- Put the compare-at-price, which is a way to show customers the discount they are getting.
- Tick the tax box to charge sales tax on the product (Shopify calculates tax automatically)
Set Shipping Charges
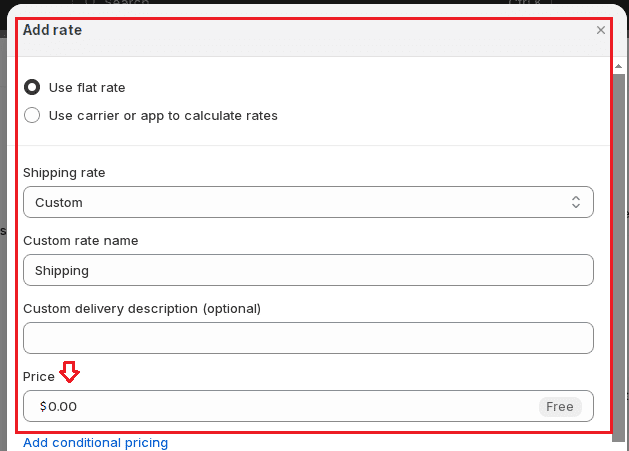
- On the Shopify admin page, click Settings.
- Next, click on Shipping and Delivery and navigate to the Shipping section.
- Choose the zone and click on the Add rate option.
- If you want free shipping, just set the shipping price to ‘0.’
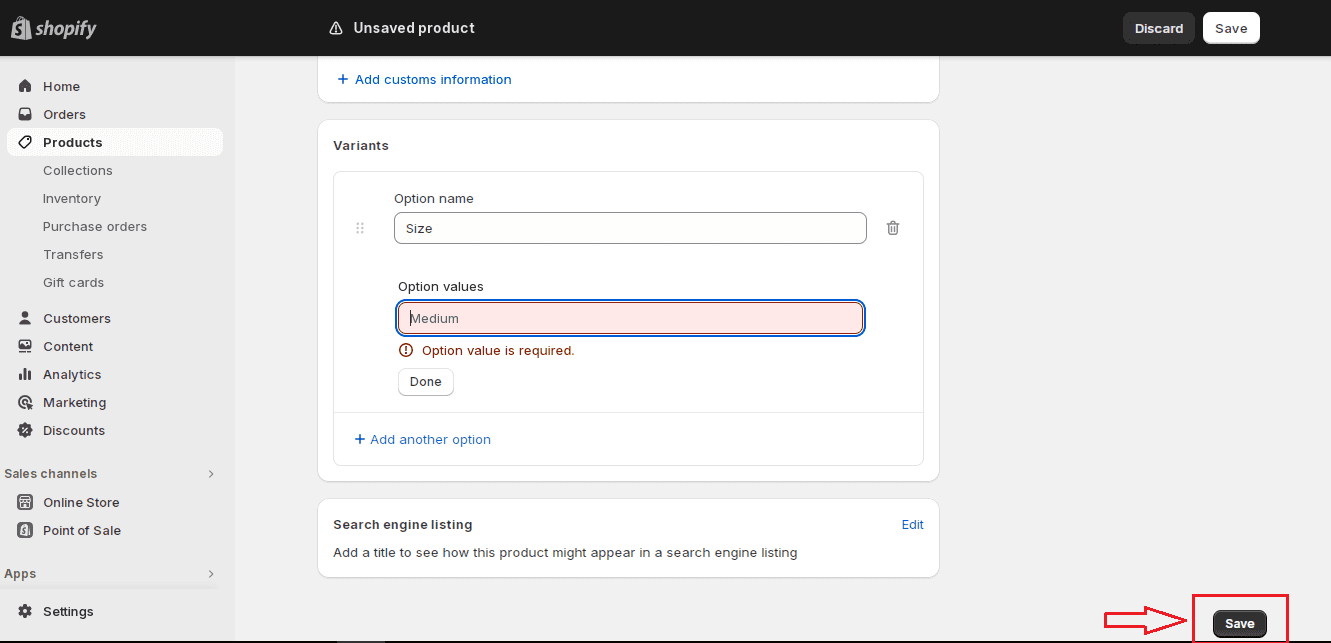
Step 4 – Add Product Variants Like Size, Colors, Types, etc
Shopify allows you to add multiple variants of your products. Here’s how you can do that;
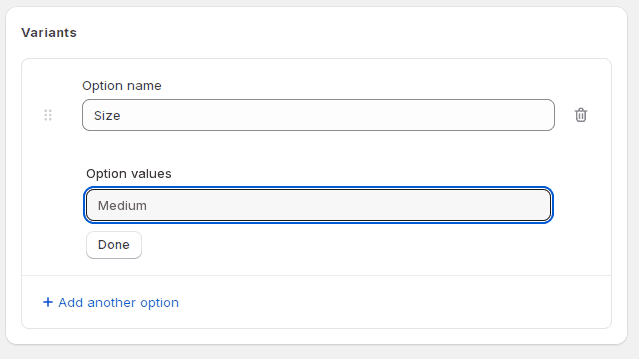
- Scroll down to the variant section on the product page
- Click on the +add another option button to add variants.
- Enter a suitable name for the variant in the Option name box.
- Fill option values like Large, Medium, or Small.
- Click on the ‘Done‘ button to save the changes.
Looking for inspiration for your own Shopify store? Check out our list of the top 100 successful Shopify stores, which you can find on our blog.
Step 5 – Organize Your Products Into Collections
Product organization lets you group multiple products for easy discoverability and hassle-free navigation in the store.
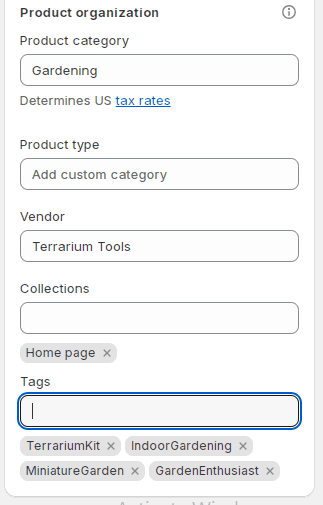
- On the lower right section of the Shopify product page, you will find the Product organization box.
- You can set the type of your product to a predefined category. In my case, it’s gardening.
- Next, you can fill in vendor names for branding purposes.
- Moving further, you have the collections option to group multiple products.
- The last box is for tags – these are specific keywords associated with your products.
Step 6 – Publish And Get Your Products Live
You are all set now; the only thing that remains is to publish your products and get them live.
Check all the details once to ensure everything is correct.
Click the Save button and then the Publish to make your products live.
Things To Know Before Adding New Products To Shopify Store
If you have everything ready beforehand, it’s only pick-and-put to craft a compelling Shopify store.
Here are the pointers to keep in mind:
1. Gather High-Quality Products Images
The first thing you must do is gather high-quality images of your products.
I can’t emphasize how critical images are to Shopify stores, so they need to be clear, crisp, and professional-looking. They must also showcase different angles and use cases of your products.
I also recommend lifestyle photography to engage with your audience more effectively.
2. Write A Killer Product Description
Next comes the product description. Product titles should be to the point, catchy, and concise.
The description should go beyond just highlighting features – craft a narrative and address customer pain points.
Also, keep the language simple and lucid so that it is easy to understand.
3. Finalize The Pricing
Each product you are listing should have a pricing finalized beforehand. Research the market to find the sweet spot that beats your competitors and still keeps you profitable.
4. Decide On Product Variants
You might be selling products with multiple variants- color, size, material, etc.
So, be clear about your variants; it will help you leverage the variants options in Shopify and provide your customers with multiple shopping options.
5. Optimize Product Descriptions For Search Engines
Last but not least, your Shopify store should be SEO-optimized.
Add relevant keywords and tags in your product titles and descriptions. It will boost your store’s visibility in search engines and improve its ranking.
Better visibility means more traffic, which translates into more sales.
Some related posts on Shopify:
Summary: Add Products To Your Shopify Store In 6 Simple Steps
Thus, adding products to Shopify shouldn’t be a hassle as you follow all the required steps correctly.
I have broken down the process into six simple steps, enabling you to showcase your products and start making sales in no time.
Go on, follow these steps, and add your first product to Shopify with ease. If product description troubles you, put Shopify AI to work and watch your product shine as it goes live!
FAQs
Yes, you need a Shopify plan, but you can start with the Shopify Free Trial to test adding products.
Yes! Shopify’s AI tool (Magic) can generate product descriptions based on your keywords and tone preferences.
Scroll to the Media section, click Upload, and choose images from your device. You can also drag and drop files.
Go to the Pricing section, enter your price, and optionally set a Compare-at-price to show discounts.
Yes, under Variants, click Add Another Option, then enter different sizes, colors, or types for your product.
